pyp

Lessons Learned from PYP Exhibition

This year was my first time being the lead teacher on the PYP Exhibition at my school. In the past two years I have served as a mentor, but this year was my opportunity to step up and take on the leadership of the PYP Exhibition.

I was fortunate to be supported by my school to attend ‘The Exhibition (Category 2)’ training the face-to-face format. I found that attending the training was beneficial to fully understanding the purpose of exhibition both in my role as a homeroom teacher but also as the PYP Coordinator. ‘

Lesson #1The Exhibition is the responsibility of all teachers within the programme.
The Exhibition is the culmination of the PYP, and as a result, it is a reflection of everything that the students have developed as learners throughout the programme, not only in the final year. Often, the teacher who is responsible for leading the group of students through the exhibition feels an added level of pressure as they are directly responsible for the group of students. Taking time to establish essential agreements and understandings around the purpose of exhibition and the scope of exhibition will help to lay the ground work for meaningful conversation regarding student’s exhibition experience.

Lesson #2 Invest in developing a detailed timeline in advance, but remain flexible!
There is no prescribed way to deliver the PYP Exhibition; however, there are many requirements as describe in the Exhibition Guidelines document. As a result, it is important to carefully consider what components of the exhibition process are required and allocated appropriate time and resources for them. Providing time for students to take community visits, have guest speakers, contact primary resources are all important elements to student led inquiry and all benefit from having a timeline. That being said, it is important to remain flexible and consider individual situations with professional judgement as learning is not a linear process.

Lesson #3 Build in time and provide tools for reflection throughout the process.
In order to help keep the focus of the exhibition on the process of learning, instead of completely on the final product, make sure to build in non-negotiable time for reflection. Some of the ways that it did this included:

Screen Shot 2016-07-19 at 11.59.21 AM

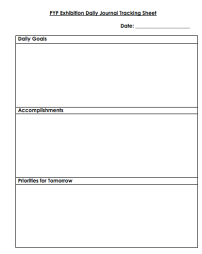
Daily Tracking Sheet

Daily tracking sheets – Students take a few minutes at the beginning and end of every day to set priorities, acknowledge progress, and identify next steps.
Weekly recap sheets – Each Friday, students had time to reflect on their week by answer open-ended questions and identifying the Learner Profile attribute, attitudes, and Approaches to Learning that they displayed, utilized, or applied that week.

Screen Shot 2016-07-19 at 12.02.00 PM

Open Ended Questions

Video Journals – At the completion of various stages of the inquiry process, students were provided with the same set of questions to answer. This was done multiple times and then students were able to look at how their answers were impacted by their research. By using the video format, it provided another modality for students to express themselves and talk about themselves as learners.


Lesson #4Communication is essential.
As the exhibition unit is a slightly different format from the rest of the programme of inquiry, it is essential to develop strong communication with the involved students, families, and wider school community to maintain a positive climate. It is important to acknowledge that exhibition will challenge the students involved, and there will be difficult situation to work through but at the core the process will be empowering and enjoyable for the students involved.

Lesson #5 – Document, document, document!
Take lots of pictures, shoot video, capture the learning in action. The exhibition process can be exhausting, overwhelming, and is over before you know it. Make sure to use technology to assist in the documentation process to help you remember all of the wonderful moments that happened throughout. Your documentation will be valuable to help with the assessment process, but also provides a vehicle for celebration.

Here is a video produced with some of my students talking about PYP Exhibition.

If you have other lessons that you have learned about PYP Exhibition, please comment below! We are better together, when we share and learn from each other.


Tackling Conferences as a Team

This past weekend, I was fortunate to attend the IB Annual Regional Conference of the Americas hosted in Toronto, Ontario. The theme for the conference was Learning Together, and there was over 1,400 educators from around the world in attendance. With the conference happening so close to my school, we were able to send a strong team of 19 to the conference from across the PYP, MYP and DP teaching teams within the school.

One of the challenges that I have experienced at conferences is often wanting to be in more than one place at a time. Often, there are two or more sessions happening simultaneously that I am interested in going to. The IB Conference is no exception to this rule! With having a strong team of people attending a conference together, it is possible to use technology to help everyone gather knowledge from multiple sessions that are happening at the same time so people don’t have to worry about not being in two places at once.

The first time that I saw this approach being used was at Integrated 2014 in Portland, Oregon. The conference organizers created a hyperlinked GoogleDoc that listed all of the conference sessions and encouraged participants to record there notes in the document for all of the conference attendees to share. Throughout the sessions, participants helped to build a robust document with notes from all of the sessions. After the conference, participants could read about other workshops, click on links and benefit from the shared knowledge of other participants. Even if you had attended this conference as the only teacher from your school or district, you still had a ‘team’ to learn with and from. Although this document was very useful, it was overwhelming the quantity of notes that it included and the context of note taking varied among participants.

If you are fortunate enough to be attending a conference with a team of educators from your school or district, it is a wonderful opportunity to harness technology to fuel a collaborative team approach to tackling the conference! It also allows members of your team who are not able to attend the conference to benefit from the knowledge gained at the conference as the document can be shared with a wider audience after the fact.

In advance of the conference, an online collaborative document can be created in a tool such as GoogleDocs and shared with the members of your team that are attending the conference. When setting up the document you might want to consider what format would make the most sense for note taking. Is there certain information that you would like from each session (i.e., names of the presenters, email addresses, links)? Do you want the notes to be anonymous or would you like people to attach their name to the notes? How can the ‘comments’ feature be used? Can a highlighting colour system be created to help draw attention to action items? One tip is to use the ‘Table of Contents’ feature within GoogleDocs to create a hyperlinked schedule at the beginning of the document to make navigation easier.

Following the conference, it might be helpful to have one person take a few minutes to ‘clean up’ up the document. This does not mean removing any notes, simply looking for places where there are extra spaces that could be removed, making font size consistent, and other things to make the document visually appealing for when it is shared with a wider audience.

In using this approach at the IB conference, I found that my own experience was enriched by the experiences of my colleagues who were also in attendance. I was able to gain knowledge from sessions I did not attend in person and I am able to start specific conversations with people about the sessions they attended.

I hope that this type of collaboration and sharing becomes a standard practice at more conference in the future.


‘The Trading Game’ ~ A classroom simulation

As part of our final PYP unit of inquiry for this year my students are examining the central idea “Organization is critical to the effective use of natural resources.”  In researching Canada’s natural resources, we discovered that many ‘regions’ (physical or political) produce specific natural resources. This means, that it is necessary to ‘share’ or ‘trade’ them in order for them to be used effectively. As we dug deeper into our inquiry, I suggested that we could try and simulate how we could share the natural resources to discover why organization was so important.

My students were full of ideas about how we should structure the simulation that I was referring to as “The Trading Game”. One of the books that we had explored was from the Close Up Canada Series – Canada’s Natural Resources. This book had classified natural resources into 5 categories – forests (pulp and paper, habitats), water (fresh water, aquaculture), land/soil (agriculture), rocks/minerals, and energy. After we had learned about the various natural resources each group of students was assigned a physical region of Canada to research and had to learn about the natural resources present in that environment.

Then came developing the game!

As a class we decided that for our purposes each physical region would have the same ‘number’ of resources to export or trade in the game at the beginning of the game; however, as a few groups learned, the population is certain parts of the country (Great Lakes-St. Lawrence Lowlands) was a much greater percentage of the population so they would require a greater percentage of the resources. Thus, the amount of resources you needed to have at the end of the simulation could be higher or lower than your starting number.  It was interesting to develop the game as a class as a discussion because each physical region needed to make sure that they were representing the best interests of their region.

The following chart was created during our discussion. The blue numbers represent how many resources each group will begin with and the red numbers in the circles represent how many resources they need to finish with.

The Trading Game Organizational Chart

This was the chart that was created to record our starting values (in blue) and finishing values (in red).

Next came the discussion about who would be allowed to trade with who. As we had not discussed ‘modes of transportation’ yet, it was decided that you would only be able to trade with your neighbour – based on the location on a map. This meant that if you were the Cordillera and you needed to trade with the Appalachians – you would need the Interior Plains and the Canadian Shield to assist you in the process. This added an interesting element of challenge – but also helped to develop the conceptual understanding of ‘organization’ within the process of utilizing natural resources effectively.

In looking for an easy way to represent each ‘natural resource’ in the trading game we used the ‘square tiles’ from a math manipulative bin. Each colour represented a different resource which made it visually easy to see. In order to keep track of all of the ‘natural resources’ each group used white stickers as labels to stick on their ‘squares’ and write the name of their physical region so we could track where each resource had started. As they needed to export their resources, at the end of the simulation they needed to have resources from different regions – not their own. They also needed to be conscious about having a ‘variety’ within the type of resource as ‘land/soil’ from one region would provide different resources than ‘land/soil’ from another region. This simple tracking step seemed to do the trick.

This photo shows the labeling system that was developed to keep track of where the resources had originated from.

This photo shows the labeling system that was developed to keep track of where the resources had originated from.

Throughout the trading, students were required to record the ‘trades’ that they were making. The first ’round’ students found this difficult and many partnerships were having discussions about it. When we experienced a ‘deep freeze’ in the ‘Winter’ that required us to pause the game because all transportation methods were closed, we had a good discussion about using ‘systems’ and ‘strategies’ to ‘communicate’ within the partnership to make the process more ‘effective’. It was so great to hear the students using the language from the central idea and related concepts to the unit in trying to resolve the problems that they were experiencing.

After we had our discussion, the students returned all of the resources to their ‘origin’ and we began the game again using our new knowledge to see if we could do the process more effectively. It was so interesting to see how the strategies that students were using changed, but also how the roles within the small groups also adjusted. They were much more strategic and aware of communicating clearly with the other members of their group in the second round.

At the end of the second round, we had a large group ‘knowledge building’ talk to try and make the connection between our ‘game’ and the real world. Some of the question prompts that I used are:

What are some of the things you noticed playing the trading game?
What were some ways or strategies that you used to be more organized?
Why was it important to be organized?
How does this game represent what happens in Canada? around the world?
What do you think would happen if we weren’t organized in the ways that we used our natural resources?

Some of the comments were:
“there wasn’t many connecting trades because it was too difficult to organize”
“when it got near the end it got more difficult to make your trades, you also needed to keep certain things that could be traded later”
“think about what you are going to trade – plan – helps you not make extra trades”
“have specific roles that help each other so we weren’t try to do the same thing at the same time”

I am looking forward to our continued discussion and ideas that students use in the reflection on this process.

The Door is Open … Come on in!

January has been an interesting month for me professionally as a teacher when it comes to peer observation. I have always been very open about what happens in my classroom, sharing with my PLN on my blog and Twitter. As much as possible, during the school day I try to physically keep my classroom door open so that colleagues feel free to come in my room. I think a lot of people have great intentions about observing peers (including myself), but actually finding the time to be able to can sometimes be a little more difficult. In terms of the priority list, there are often things that need to be done immediately that seem to find there way in front of peer observation.

This month I have had two teachers come into my classroom to observe both with slightly different scenarios.
The first person to come in was Canadian teacher who is currently teaching at a PYP school Australia who was home in Canada over the Christmas holidays. As the school year is different in Australia due to being in the Southern Hemisphere he was still home when Canadian schools returned back to school being in session. The second person to come in is a Masters candidate from the local university who is studying inquiry practices in the classroom. It has been interesting to reflect on how both of these opportunities have helped me to continue to grow professionally.

As we are a fairly new school to the PYP programme, it was the first time that I have had the chance to have another teacher who teaches within the PYP visit my classroom. As the PYP is a framework not a curriculum, there are many different ways to implement the program that align with the programme. Throughout the two days of the visit it was interesting to compare the techniques that I was using to what the other teacher was using. One of the first observations that the visiting teacher made was that I am the only Grade 4 teacher in my school which automatically impacted the amount and type of collaboration that was happening within my planning and teaching practices. As a result, my collaborative planning tends to occur more with the specialty teachers vs. grade level partners.

Tweet from Visiting PYP Teacher

Tweet from Visiting PYP Teacher

Over the course of the two days, we had a number of conversations about differences in the ways we were implementing the PYP. Overall, there were lots of similarities – including a number of the same units at similar grade levels.

The second observer in my classroom has been a Masters of Education candidate from the local university studying inquiry practices. As Masters of Education programs in Canada are generally more research based (not as a means to gain your teaching qualification) this observation block does not include ‘student-teaching’. One aspect that they have been really interested in is the actual process of planning for inquiry. As a profession, having to explain what you are doing and why really helps you to better understand your practices. It also forces you to be open and honest about if there are better ways that you could be going about achieving your goal.

Although these observers have been very different in their purpose, both have contributed to my professional growth. I would encourage you if you have the opportunity to open your classroom doors to observers but also to try and find time to go and observe your colleagues and members of your PLN.

Developing as Learners Through Transdisciplinary Learning

One of my favourite resources this school year has been Newsela, a website that provides a variety of non-fiction articles and the ability to adapt them to various Lexile scores (reading levels). Through Newsela I have found a number of articles that have directed related to our units of inquiry, and provided natural connections to real world topics and events.

Currently, we are looking at informative writing and our sharing the planet unit of inquiry. Today, I selected a Newela article on starfish that were dying in the Pacific Ocean. As our focus has been on informative writing, the students were using their ‘informative writing checklist’ to analyze the article and identify the strategies the author had utilized. This is a fairly standard learning activity that we have done before but today I got an interesting response after the lesson.

One student noticed that through that activity we had utilized our reading strategies (while reading the article, making predictions, etc.), our writing strategies by identify strategies the author gad utilize, and our inquiry skills as they were thinking about how the unit connected to our unity of inquiry and concepts! For me, that the student was able to articulate the different learning skills they were using was evidence that they are developing as learners!