learning

Annual Learning Plan 2016-2017

My posts about previous Annual Learning Plans (2013-2014, 2014-2015), seem to be fairly well read so I feel compelled to write about my Annual Learning Plan this year, because it has taken a new direction.

This year, all of the teachers at my school were introduced to Folio Collaborative, an online platform that provides a venue for developing ongoing conversations about teaching and learning. It is a great tool for building professional relationships and a tool that I think has a lot of potential for helping foster a dynamic learning environment for professional learning. As a part of the introduction, teachers were asked to develop professional goals but we were asked by our Dean of Teaching and Learning, to write them in the form of a question based on the work of Warren Berger in A More Beautiful Question.

Each member of faculty was provided with giant sticky note chart paper and was asked to develop 3-5 ‘Beautiful Questions’ that would form the basis of their Annual Learning Plan for this year. After the questions were written down, each member of faculty posted there chart in around our large gathering space and an adjoining hallway to share with others. We then participated in a gallery walk, where we could provide comments, suggestions or feedback related to other people’s questions. In the end, the members of my department displayed their chart papers in our staff room as a continual display of our focus for the year.

My questions that I am investigating this year are:

  1. How can I help to support students in viewing math with a growth mindset and apply the principles of positive psychology to math instruction?
  2. How can I help other teachers utilize technology to support strong pedagogy to enhance student learning?
  3. How can I better support the PYP team in strengthening their understanding of the PYP to enhance students’ learning?
  4. How can I further develop students thinking skills to enhance there ability to think critically and creatively?
  5. How can I design my units and lessons to encourage and support deeper conceptual thinking and understanding?

For each goal, there are specific related action items and I can keep track of my progress within Folio Collaborative.
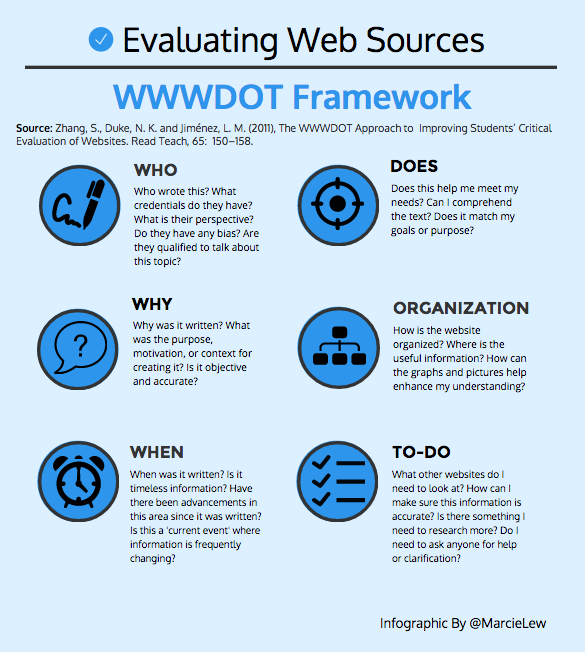
 

Evaluating using the WWWDOT Framework

Yesterday I came across this Edutopia article on the WWWDOT framework. I find that teaching students to be critical consumers of the information they read on the internet is a large task in Grade 6 so I am always looking for different strategies to help them with this process.

I decided to turn the 6 questions or steps into an infographic that I can display in my classroom or provide to students. I used a new to me tool, Venngage.com. It was pretty easy to pick up fairly quickly and the library of images and templates was excellent considering it is a free website.

Here is my finished product:

Screen Shot 2016-08-24 at 10.03.57 PM

https://infograph.venngage.com/p/137187/wwwdot-framework

Source: Zhang, S., Duke, N. K. and Jiménez, L. M. (2011), The WWWDOT Approach to Improving Students’ Critical Evaluation of Websites. Read Teach, 65: 150–158.

Lessons Learned from PYP Exhibition

This year was my first time being the lead teacher on the PYP Exhibition at my school. In the past two years I have served as a mentor, but this year was my opportunity to step up and take on the leadership of the PYP Exhibition.

I was fortunate to be supported by my school to attend ‘The Exhibition (Category 2)’ training the face-to-face format. I found that attending the training was beneficial to fully understanding the purpose of exhibition both in my role as a homeroom teacher but also as the PYP Coordinator. ‘

Lesson #1The Exhibition is the responsibility of all teachers within the programme.
The Exhibition is the culmination of the PYP, and as a result, it is a reflection of everything that the students have developed as learners throughout the programme, not only in the final year. Often, the teacher who is responsible for leading the group of students through the exhibition feels an added level of pressure as they are directly responsible for the group of students. Taking time to establish essential agreements and understandings around the purpose of exhibition and the scope of exhibition will help to lay the ground work for meaningful conversation regarding student’s exhibition experience.

Lesson #2 Invest in developing a detailed timeline in advance, but remain flexible!
There is no prescribed way to deliver the PYP Exhibition; however, there are many requirements as describe in the Exhibition Guidelines document. As a result, it is important to carefully consider what components of the exhibition process are required and allocated appropriate time and resources for them. Providing time for students to take community visits, have guest speakers, contact primary resources are all important elements to student led inquiry and all benefit from having a timeline. That being said, it is important to remain flexible and consider individual situations with professional judgement as learning is not a linear process.

Lesson #3 Build in time and provide tools for reflection throughout the process.
In order to help keep the focus of the exhibition on the process of learning, instead of completely on the final product, make sure to build in non-negotiable time for reflection. Some of the ways that it did this included:

Screen Shot 2016-07-19 at 11.59.21 AM

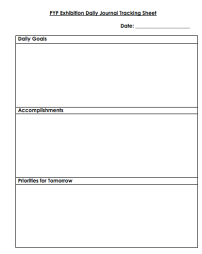
Daily Tracking Sheet

Daily tracking sheets – Students take a few minutes at the beginning and end of every day to set priorities, acknowledge progress, and identify next steps.
Weekly recap sheets – Each Friday, students had time to reflect on their week by answer open-ended questions and identifying the Learner Profile attribute, attitudes, and Approaches to Learning that they displayed, utilized, or applied that week.

Screen Shot 2016-07-19 at 12.02.00 PM

Open Ended Questions

Video Journals – At the completion of various stages of the inquiry process, students were provided with the same set of questions to answer. This was done multiple times and then students were able to look at how their answers were impacted by their research. By using the video format, it provided another modality for students to express themselves and talk about themselves as learners.


Lesson #4Communication is essential.
As the exhibition unit is a slightly different format from the rest of the programme of inquiry, it is essential to develop strong communication with the involved students, families, and wider school community to maintain a positive climate. It is important to acknowledge that exhibition will challenge the students involved, and there will be difficult situation to work through but at the core the process will be empowering and enjoyable for the students involved.

Lesson #5 – Document, document, document!
Take lots of pictures, shoot video, capture the learning in action. The exhibition process can be exhausting, overwhelming, and is over before you know it. Make sure to use technology to assist in the documentation process to help you remember all of the wonderful moments that happened throughout. Your documentation will be valuable to help with the assessment process, but also provides a vehicle for celebration.

Here is a video produced with some of my students talking about PYP Exhibition.

If you have other lessons that you have learned about PYP Exhibition, please comment below! We are better together, when we share and learn from each other.


Tackling Conferences as a Team

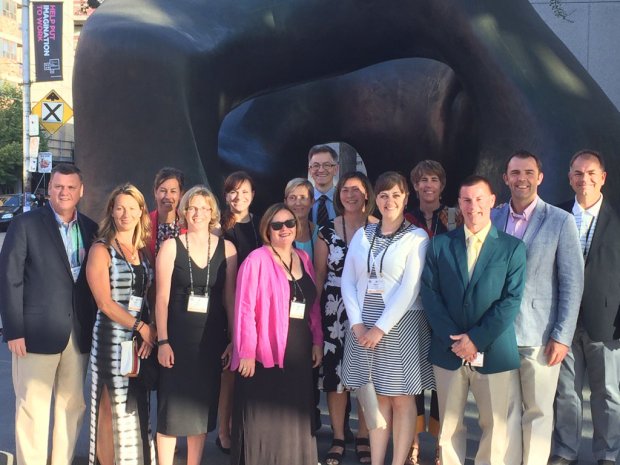
This past weekend, I was fortunate to attend the IB Annual Regional Conference of the Americas hosted in Toronto, Ontario. The theme for the conference was Learning Together, and there was over 1,400 educators from around the world in attendance. With the conference happening so close to my school, we were able to send a strong team of 19 to the conference from across the PYP, MYP and DP teaching teams within the school.

One of the challenges that I have experienced at conferences is often wanting to be in more than one place at a time. Often, there are two or more sessions happening simultaneously that I am interested in going to. The IB Conference is no exception to this rule! With having a strong team of people attending a conference together, it is possible to use technology to help everyone gather knowledge from multiple sessions that are happening at the same time so people don’t have to worry about not being in two places at once.

The first time that I saw this approach being used was at Integrated 2014 in Portland, Oregon. The conference organizers created a hyperlinked GoogleDoc that listed all of the conference sessions and encouraged participants to record there notes in the document for all of the conference attendees to share. Throughout the sessions, participants helped to build a robust document with notes from all of the sessions. After the conference, participants could read about other workshops, click on links and benefit from the shared knowledge of other participants. Even if you had attended this conference as the only teacher from your school or district, you still had a ‘team’ to learn with and from. Although this document was very useful, it was overwhelming the quantity of notes that it included and the context of note taking varied among participants.

If you are fortunate enough to be attending a conference with a team of educators from your school or district, it is a wonderful opportunity to harness technology to fuel a collaborative team approach to tackling the conference! It also allows members of your team who are not able to attend the conference to benefit from the knowledge gained at the conference as the document can be shared with a wider audience after the fact.

In advance of the conference, an online collaborative document can be created in a tool such as GoogleDocs and shared with the members of your team that are attending the conference. When setting up the document you might want to consider what format would make the most sense for note taking. Is there certain information that you would like from each session (i.e., names of the presenters, email addresses, links)? Do you want the notes to be anonymous or would you like people to attach their name to the notes? How can the ‘comments’ feature be used? Can a highlighting colour system be created to help draw attention to action items? One tip is to use the ‘Table of Contents’ feature within GoogleDocs to create a hyperlinked schedule at the beginning of the document to make navigation easier.

Following the conference, it might be helpful to have one person take a few minutes to ‘clean up’ up the document. This does not mean removing any notes, simply looking for places where there are extra spaces that could be removed, making font size consistent, and other things to make the document visually appealing for when it is shared with a wider audience.

In using this approach at the IB conference, I found that my own experience was enriched by the experiences of my colleagues who were also in attendance. I was able to gain knowledge from sessions I did not attend in person and I am able to start specific conversations with people about the sessions they attended.

I hope that this type of collaboration and sharing becomes a standard practice at more conference in the future.


Quick Tech Tip: Simple English

When my students are researching, they often find Wikipedia articles that they want to use to help them grasp a quick understanding of a topic before digging in to find other primary and secondary sources of information. Depending on the topic, some Wikipedia articles can be written at a very high reading level that can provide challenges for Elementary School students or English Language Learners to understand. One ‘solution’ to assist with this is the use of the ‘Simple English’ language from the ‘Language’ options on Wikipedia. Many articles have this as a language option and it does a good job on simplifying the content to make it easier to comprehend.

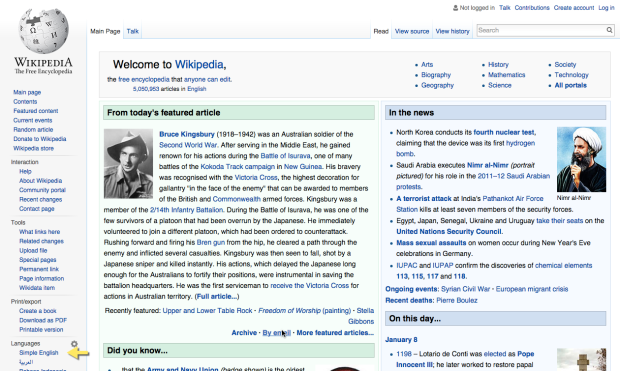
From the Wikipedia Homepage you can automatically select ‘Simple English’ as the language you would like to search in.

As you can see, the ability to select what language you would like to search in can be found on the left hand sidebar. Wikipedia Homepage Simple English.png

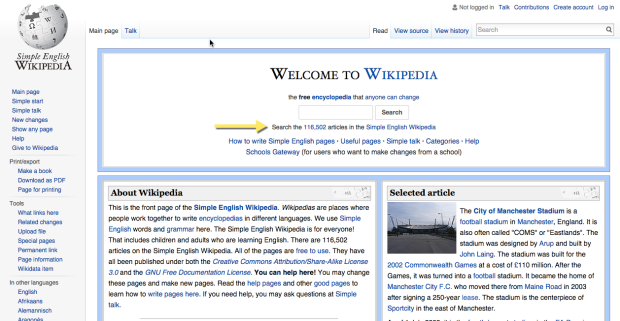
After clicking on ‘Simple English’, you will be directed to an onmibox (search box) where you can search for articles in Simple English.

Wikipedia Simple English Search Page.png

You can also perform a search in English and then select ‘Simple English’ from the language menu if you find that the article is too challenging to read.